
As a blogger, I know how critical it is to have complete control over the images I upload to my website. Of course, there have been times where I want to update some old photos for a blog post and I have to go into the old post, upload new photos, delete the old photos, and replace all the old files with the new links, etc. This is tedious work and takes a lot of time.
Isn’t there a simpler way?
Why, Yes! I am so glad you asked!
Enter the Enable Media Replace plugin. This plugin lets you upload new files for all the images in your media library without having to go through the post editor, remove old photos, add new ones, re-name, etc. This plugin does all that with just 3 clicks!
So let’s dive right into how to do all that!
Install and Activate the Enable Media Replace Plugin [FREE]
Go to the plugins page of your WordPress dashboard and search Enable Media Replace. Then install and activate per usual.
This plugin works out-of-the-box, meaning there are no settings to configure for it to work properly.
Choose File to Replace
Once activated go to your media library and make sure you are in the ‘list view’. Locate the image you would like to replace and when you hover your mouse over the image you’ll see a new setting that says ‘Replace media’ like in the picture below.
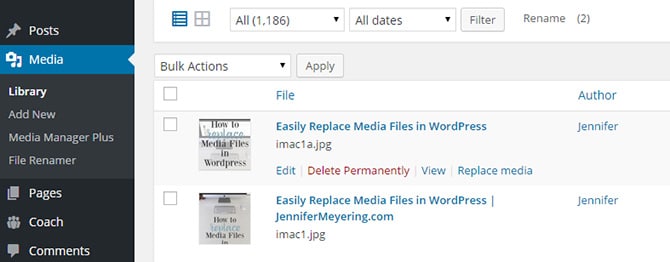
When you click the new ‘Replace media’ link, it will take you to the replace media page.
Choose File to Replace with
When on that page, you will choose the file you would like to use to replace the old file.
There are also 2 options: Replace the file without replacing the file name, or replace the file and update the filename and all links pointing to the old file.
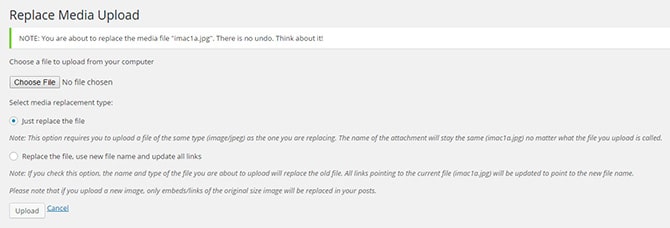
Personally, I just replace the old file without updating the name and links because I have a separate plugin [find that post here] that I use to change all the filenames and update links.
Upload and Done!
After you click the ‘Upload’ after choosing your file, WordPress will upload your new file and the plugin will replace the old media file with the new one. If you opted to use the new filename and update links, then the plugin will take care of that too.
You can now visit the post or page where the media was located and you will see the new image in place of the old one.
Note: if you use browser caching or use CloudFlare CDN, you need to temporarily disable your CloudFlare CDN before upload the new file for the changes to take effect and then clear your browser cache. You can then reload the page and you will see your changes. Re-enable your CDN and you’re all set!